Article Sections:
Contents
Introduction
A flexible lighting system is something that I have wanted to play with for a while, but like everything else in photography it seems to be a fairly expensive area to get into, at least when you consider the relative simplicity of a light-bulb.
Thankfully there are a number of cheap and widely-available or easily-made items that can provide most of the same functionality at a small fraction of the price. For under US$75, this article will show you how to put together a flexible and robust homemade photography lighting system that is both useful and relatively easy on the hip pocket.

I am not suggesting these items are just as good as the expensive purpose-built ones, just that they provide surprisingly good results and are very inexpensive. My main point is that not being able to afford the “proper” gear should not be a barrier to experimenting with lighting. I also don’t pretend to be an expert in these things, so some old pros may well be sniggering as they read this. Oh well. We all have to start somewhere and I am simply sharing my experiences.
Getting Started top
Despite trying to keep costs down, I’ve also tried to avoid being cheap-and-nasty about things. All these items should be constructed well enough to last quite a long time for the average amateur, and when being used they should look like they were built for the task they are being used for. I don’t feel embarrassed using these items in front of other people.
Although I paid for all items in Australian dollars, I will roughly convert the prices to US dollars to provide an easier comparison for our international readers.
The items I include in this article are:
- A system of 3 hot-lights (2 on a tripod) ranging from 200watts to 500watts each (around US$15 per light).
- Large diffusers for the hot-lights about 120x135cm with stands (around US$10 each)
- Large very portable reflectors about 130x150cm of silver and white (around US$4 each)
- A selection of external Perspex flash diffusers similar to a “Sto-fen Omnibounce” or other similar items (free!)
Before I get into the components of my system I should point out that one very important lighting component that is pretty much essential but does not come under the “Cheap and DIY” heading, is an external flash unit. As far as I know it is a bit tougher to build a cheap DIY flash that is compatible with your camera’s metering, is compact and will easily mount on top of the camera.
I would strongly suggest buying an external flash unit to anyone who wants to go beyond shooting in available light. A decent external flash bounced off a wall looks a million times better than a camera’s built-in flash – its not just the power of the flash, but also the quality of light. If you are on a tight budget then you may want to look at 2nd hand units and/or 3rd party brands. Be careful though, choosing the right flash is important and not always simple! Very important is the ability to integrate with your cameras metering system, which can rule out a lot of brands and older models. I also consider the ability for the head to tilt and twist as an essential requirement to avoiding the flat, “deer in the headlights” look that a dead on flash will produce. Beyond that, it is up to you, your requirements and your budget.
I will assume you already have an external flash unit, but if you don’t then most of this article is still relevant and useful to you.
Components top
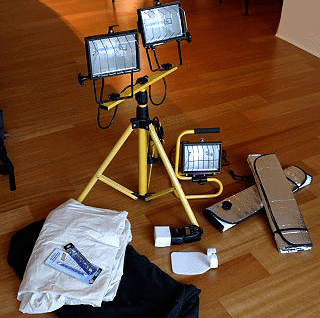
Hot Lights
I am not sure about other countries, but here in Australia, if you walk into one of the large hardware store chains (Bunnings, Mitre 10, etc) then you will no doubt have noticed the inexpensive bright yellow 500watt high-power halogen lights designed for home decorators that seem to be perpetually “on special”. They usually come in two flavours – as a single light in a metal enclosure and small base designed to sit on a table or shelf, or as a free-standing pair of lights on top of an adjustable tripod designed to be raised to a height of about 2m. The tripod lights are going to be probably most useful to you (and at about US$25 they are very cheap), but the single lights are also so cheap (about US$11) that it is a shame not to have one of those up your sleeve as well.

There is one big problem with these lights, however – they are halogen tungsten lights. The light they throw is very yellow and usually not desirable for colour photography. If you shoot in Black and White then you can get away with it, but if you shoot colour and especially if you want to mix this light with other light sources such as daylight or flash, then we need to do something about it.
Luckily the solution is just as easy. There are replacement globes available for these lights that are tinted blue to cancel out the warm colour temperature of the light. See the end of this article for some comparison photos of the same scene under different light sources shot with identical white balance settings.
I was a little skeptical at first but I bought some to give them a go anyway. My skepticism quickly disappeared – I was not able to tell the difference between the light from these lamps and from my external flash. They seem to work really well.

The particular globes I bought were made by an Australian company called Nelson (www.nelsonlamps.com.au) and were called “Ultra White Light (3200K)” double-ended tungsten halogen lamps. I bought them from Bunnings Hardware at about US$4 each, and they range from about 200watts to 500watts. I suspect this particular brand isn’t widely available overseas, but I am sure there are other brands that are. The blue tint of the globes is a dead giveaway that the globes are designed to give a light that is closer to daylight.
Note also that these lights get very, very hot! Be careful with them and do read the safety and handling instructions. Make sure you don’t put them too close to anything, and give room for air to circulate around them, unless you prefer shooting by firelight as well.
Hot Light Diffusers Similar to a Lighting Softbox
One technique to achieve that “soft” quality light is to diffuse the light, or spread it over a large area instead of having it come from one small globe. The simplest way to get a large diffused light from the hot lights above is to bounce them off a white wall or ceiling. But sometimes that isn’t possible, or sometimes you want a bit more control than that.
A very simple solution is to get some material (and old white bed sheet is ideal) and hang it up in front of the light to diffuse it or behind the light to reflect it (far enough away to not be a fire hazard).
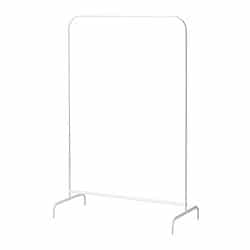
The biggest problem is probably finding some kind of framework to allow you to hang the sheet in a free-standing kind of way, in which case you can hit the hardware stores again or go somewhere like Ikea and get a cheap clothes rail like this one for around US$9.99 (the price shown on the website is in Australian dollars).
I must admit that I haven not actually made any of these yet, so I cannot say for sure that they work well. However, I have used similar things with success and this seems like a good idea, so I am including it untried and untested.
These sheets can have light shined through them, reflected off them, or you could use heavier material (curtain backing material is ideal because it is light-proof) and use them like “barn doors” to prevent light from going where you don’t want it.
You could also use different coloured material (different bed sheets or towels perhaps) to tint the light as it bounces off or shines through.
Reflectors
As you might have guessed, reflectors throw light back onto the subject for illuminating shadow area, providing highlights and lighting from a different angle. They are similar to the items above, but these are handy to have around wherever you are shooting.
The simplest solution I found was a windshield sun shade designed for cars. They are usually silver on one side and white on the other which is perfect , but you can get different colors instead of silver. Here is one on Amazon as an example.

Just buy one and leave it in your car. Not only will you almost always have a reflector with you, but you will have a sun shade for your car on hot days too! I also keep one folded up in my camera bag.
They also often have suction caps or hooks which allow you to stick them to windows or walls. I most often use these to give me something to bounce my flash off when there is no wall or ceiling handy or to reflect sunlight to lighten deep shadows.
DIY Flash Diffuser
So far everything has really been a matter of finding the right bits rather than actually building anything, but now things get a little trickier. For this one you will need a couple of tools and to do a little bit of work.
The idea is simple. There are plenty of flash modifiers out there, the most well-known being the Sto-fen Omnibounce (http://www.stofen.com). They are really useful, but considering they are nothing more than a piece of translucent plastic they are also really expensive!
I was lucky enough to have a heap of off-cuts of translucent white Perspex lying around my house so thought I should make my own.

This kind of white translucent Perspex is ideal. It is designed specifically to diffuse light as it is most often used in illuminated signs and so on. It lets plenty of light through but also diffuses the light well. Its also strong and light and will last forever.
In case you are wondering how much Perspex sheets cost, I should perhaps explain how I originally came to obtain it. I simply looked in the Yellow Pages for sign-making businesses in my local area to ask about their Perspex off-cuts (I was prepared to pay a few dollars for a selection of different types – it was for a completely different project not related to photography). The first place I rang that actually worked with Perspex told me to drop in at the end of the day. When I got there the manager walked me over to three large bins full of a huge variety of off-cuts from their day’s work and told me to help myself for free. He seemed happy that some of their waste was being recycled, and obviously I was happy when I walked out of there, barely able to carry the 40kg of Perspex pieces of all shapes, sizes and styles in my arms!
So I recommend you make some phone calls and get some scraps. Not only will it save you money but you will be helping recycle and reduce waste. Plus having bits of plastic and Perspex lying around can be very handy for lots of other things. I have used it to make many things from boxes, face-plates and brackets to a Hannibal mask for a fancy dress party!

Assuming you have managed to get your hands on some white translucent Perspex (mine is 3mm thick and works fine, but I would recommend about 2mm if you have a choice) the next step is to make sure you have the tools to work with it.
All you really need are a cheap jig-saw and heat gun. If you don’t have these tools, I actually found the cost of these inexpensive tools still worked out a bit cheaper than buying a single Sto-fen Omnibounce! Plus, you will have the tools to make other things later (including other flash diffusers). You may also want to use a rotary multi-tool such as a Dremel (http://www.dremel.com) to clean up the edges of your cuts if you want a professional-looking job, but if you are careful you can get a pretty good result with just a jig-saw and maybe some sandpaper. You could also use a little blow-torch instead of a heat gun, but you might find it more difficult to get a nice even heat, and the Perspex might bubble and go a bit brown where you heat it too much.
Before we start hacking into the Perspex however, we need to make a template so we know where to cut. This is pretty easy, just measure up your flash and then make some mock-ups out of paper or card and try them on the flash unit. Paper actually works OK as a diffuser and reflector too, so you can take some photo tests and get a rough idea of how the finished product will operate too.

I have made two different diffusers for myself ( see fig 7 and 8 ) – the first acts like the Omnibounce and diffuses light in all directions. The second looks like a slightly curved ping-pong paddle and provides a large catchlight while allowing most of the light to go past it and bounce off a wall or ceiling to illuminate the subject like a normal bounce flash. I find this really useful, although not always convenient to use. Note that in the photos, both my designs have little tabs cut and bent in them that prevent the diffuser from slipping too far down the flash head (see fig 9). I recommend doing this, but it is one thing you can’t easily test with your paper mock-ups because paper isn’t stiff enough.

Once you have a design you are happy with, simply disassemble the paper version and stick it to the Perspex with sticky tape, to provide a template. Then carefully cut around it with the jig-saw and mark where the bends should go before removing the template.
Now very carefully use the heat gun to apply gentle and even heat to both sides of the Perspex where you want to bend it. It will slowly heat up and then become flexible enough to bend and hold in its new position until it cools. Be patient and careful, and have your flash unit handy so you can test-fit it as you go and get a snug (but not too tight) fit. It is a good idea to do a practice run at this to get used to it first. The Perspex will get very hot, so oven-mitts can be useful for handling it without burning yourself. I recommend having some water close by (like a metal sink), so you can quickly drop the Perspex into should it catch fire or get too hot.
The final touch to this is something to allow the diffuser to fit the flash tightly without scratching it. I used some felt tape that I had lying around that was bought from an automotive store. It is basically a strip of felt material with adhesive on one side, designed to help prevent squeaks and rattles in cars. I simply picked away most of the felt to give a nice fit without scratching. Another alternative might be the adhesive felt pieces you can buy to stick to the bottom of furniture to prevent it scratching floors.
Test Shots top
Finally, below are some test shots of a sample scene with identical white balance settings (set to a generic “Daylight” setting) to see the difference between daylight, flash, the “ultra white” tungsten halogen and normal tungsten halogen. They were not taken in particularly controlled circumstances or designed to be scientific tests. They are just a couple of quick shots to illustrate some of the points above.

")
")
")
Conclusion: A Perfect Lighting Kit for Portrait Photography! top
There is no question that lighting systems can open up whole new worlds of shooting opportunity and experimentation. The problem for most is that, in the beginning at least, it might be too expensive to justify. For many people, an external flash unit might be the extent (or past the extent) of many peoples’ lighting budgets. This whole system cost me under US$75, and hopefully these ideas might help people in this position to get started.
Key terms [Photography glossary]
- Lighting Softbox – Diffuses light into a pleasing soft, even light. When used correctly, it will reduce harsh shadows.
- DIY – “Do It Yourself” or Homemade.
- Hot Lights – Photoflood, Tungsten, Quartz, and all various kinds of continuous light sources.
- Diffuser – Spreads out the light from the flash of a camera.
- Photography Light Meter – A device used to measure the amount of light in an area. In photography it is used to determine the proper exposure for a photograph.
Be sure to check out our article on How to Build a DIY Flash Bracket for Under 5 Dollars
Was this article helpful? Feel free to leave any feedback or comments.
This article copyright © 2006, Adrian Broughton.
Email: adrian@digitalkinetics.org Web: http://www.digitalkinetics.org
You may not reproduce these images or article without permission of the author.
If you’re comfortable (& knowledgable) enough it is a simple matter to remove the halogen lamp fittings & replace them with standard household bulb fittings. Once that’s done you can use Compact Fluorescant Lights (CFL). These can be easily found in daylight balanced versions & they’re cool (to the touch). Think DIY Spiderlites!
WARNING: DO NOT MESS WITH THE WIRING & ELECTRICS UNLESS YOU KNOW WHAT YOU’RE DOING.
If you’ll search for T3 Quartz Halogen lights, double ended, and in the voltage you need, you’ll find several places that sell them. Here’s the description of the lights:
“These Double ended quartz halogen bulbs have a 2000 hour average life span. They give off a crisp, white light that is ideal for displays and enhancing colors.”
I just ordered some. I’ll update on how they work.
~A
Check out http://www.dealextreme.com and they have a section I believe in the hobbies then go to photo tools. Or you just could type in they seach bar to come up with a better list. I’m a new photographer but I know they have some tools you would find interesting in regards to lighting.
Looking forward to see what someone can come up with from there.
If you’re comfortable (& knowledgable) enough it is a simple matter to remove the halogen lamp fittings & replace them with standard household bulb fittings. Once that’s done you can use Compact Fluorescant Lights (CFL). These can be easily found in daylight balanced versions & they’re cool (to the touch). Think DIY Spiderlites!
WARNING: DO NOT MESS WITH THE WIRING & ELECTRICS UNLESS YOU KNOW WHAT YOU’RE DOING.
perspex is a really thin plastic material
thats what we call it in australia…
I have went to every hardware store in my area (Lowes, Home Depot, True Value) and no luck with the bulbs. I looked online and no luck so far. Im going to continue my search but if anyone can link where they got these it would be a huge help to some of us.
Thanks!
Tom
Where did you find that awesome split-window bus on the back of the couch?
GREAT Article, now I’m looking desperately for the bulbs as I already own a set of these lights.
If anyone comes up with a distributor let me know please….
If you’re using a digital SLR (which I presume people are now), don’t worry too much about finding daylight balanced bulbs for the halogen lights.
There are several ways around the colour temperature problem, besides using different bulbs (two of which are free):
1) Set a custom white balance at the time of the shoot – this usually involves taking a photo of something white. Refer to your camera’s manual for exactly how to do this.
2) Take a photo on a regular basis with a good quality grey card and shoot in RAW. You can then easily adjust the white balance in your editing software after. You may want to still do this even if you set a custom white balance at the time of the shoot to make sure you get it right.
3) Use a daylight balanced gel on the lights – Lee filters are one of the main manufacturers. These are made to be used with constant light, so should, I believe, stand up well to heat – but do make sure they do not overheat on halogen lights!
Hi,
I had the same problem, finding the blue tinted bulb was impossible (in Ireland and UK).
So since I worked for a stained glass company I had a good knowledge on different coloured glasses.
MY SOLUTION:
dark blue water glass (that’s the name of the glass, you can get it at the nearest stained glass workshop)
It is thin, and cracks from the heat but I sliced it up to four pieces and this way it stands the heat.
You can also get it toughened (tempered) but it’s expensive.
The result is bright white light (although the blue glass shades the light a little)
WORD OF CAUTION- – – DO NOT OPERATE WITHOUT GLASS!!!
Halogen blubs burn hot and can explode! As a career Firefighter, I have gone to fires that started by halogen bulbs. When handling bulbs, you cannot handle with bare hands. The oils from your fingers can and will fry on the glass causing it to explode. The glass is usually held in place by metal clips on the side, that require a little prying to get off.
Please use caution.
Hi,
I am also having a hard time finding “Ultra White Light (3200K)” double-ended tungsten halogen lamps in the UK. Does ANYBODY know where to get them?
Thanks!
Thank you!
I ordered my work lamps and two cheap clothing racks to hang a sheet over for light diffusion from Walmart today. If the clothing racks don’t end up working I can always use them to hang seasonal clothes on (imagine that). I’m going to be shooting apparel low to the ground on an angled board/frame I’m constructing with a high tripod so I didn’t need to buy the work lamps on the stand and have a couple of milk crates if I need to raise the single work lights off of the ground a bit.
I’m using white foam core as the backing on the frame to pin the clothing articles to and am using white styrofoam sheets on the side to control light. I’m going to try without anything on the top but can always add another piece to make a full cheapo light box. I think I’m going to be able to pull my whole budget photo studio together for about $50.
Your suggestions were very helpful.
Plexiglas is another name for perspex
Don’t try to dim incandescent lights. As you dim them they colour-shift drastically towards yellow.
If you want to drop the light level, either buy a lower rated globe (these linear halogens come and various ratings from 100W up to 500W) or simply move the light further away. The inverse-square law is your friend.
Fantastic…. thanks so much!
ooh
Im gonna try some of these tungsten lights with my photo umberellas
Thanks for the post! I bought the double work light seen here and put it together. Love the sturdiness and adjustability. I also got a touch dimmer plug and it worked to allow me to dim both lights to three settings. But the dimmer stopped working after a couple of minutes for no apparent reason. I also found LED work lights, including one on a stand, but they cost 3x as much and are less bright. Also, while I have not tested it yet on these lights, I think you should be able to adjust the white balance of any DSLR camera to compensate for light temperature. Also, the bright white bulbs (you call them globes) do not appear blue, but seem to produce a nice white light. I’m working on rigging a diffuser attached to the stand. I’m wondering about frosted glass instead of clear…
Helpful post! If Editing this photos more beautiful like clipping path, Background remove, Image masking, Neck joint/ghost mannequin, Wrinkle reduce, Natural shadow, Drop Shadow, Realistic shadow, Photo Retouch, model smooth skin and Recolor/Color correction. I can give a perfect & clean job. If you want I can make a sample for you to show my skill & talent. Thanks