Article Sections:
Discuss:
Discuss this Article in the forums
Contents
Introduction
So you got a Canon EOS Digital SLR for the holidays, you’ve filled your compact flash card with holiday snapshots, and now you’re wondering how to go about processing all of those RAW files you’ve got stored on the card. Should you buy the full version of Photoshop to get access to the Adobe Camera RAW converter? Invest in Capture One for its reportedly great workflow? Or try the upstart Bibble converter that seems to be gaining in popularity?
Well if you’re like us then you’re a bit light on post-holiday cash. Fortunately for us paupers, Canon released version 1.5 of its free Digital Photo Professional (DPP) RAW converter just in time for the holidays, with camera support now stretching from the entry-level EOS Digital Rebel (300D) up through the top-of-the-line EOS 1Ds Mark II. DPP 1.5 also offers limited image editing functionality for images taken with the 8mp Powershot Pro1.
In this article, we take a closer look at Canon’s RAW image processor for its EOS Digital SLR cameras.
Getting Started top
From their site: “‘Digital Photo Professional 1.5’ is a new software developed for the Digital EOS SLR Cameras to provide high speed RAW image processing and digital workflow solution to support professional users.”
DPP 1.5 is a solid improvement over earlier versions of the software. In addition to beefed-up camera support, version 1.5 offers cropping, printer profile selection, ICC profile tagging of converted JPEGs, and user-controlled sharpness settings for TIFF images. DPP is still not the best RAW converter, in our opinion, but it does an adequate job and the price is tough to beat.
A pleasant surprise is the level of user support that Canon has put behind DPP. At http://www.photoworkshop.com/canon/dpp/, users can view a series of video tutorials hosted by award-winning photographer Eddie Tapp. Though the tutorials are based on an earlier version of DPP, users can still gain insight into the basic workings of the product.
DPP 1.5 is available for free download at Canon’s regional websites, including http://www.canon-europe.com/Support/Patches/dpp/ in Europe. DPP can also be found with a little bit of effort on Canon’s USA website, by clicking http://www.canoneos.com and surfing through the java-scripted options that take you to the download software for your camera model.
Workflow top
Browsing Around
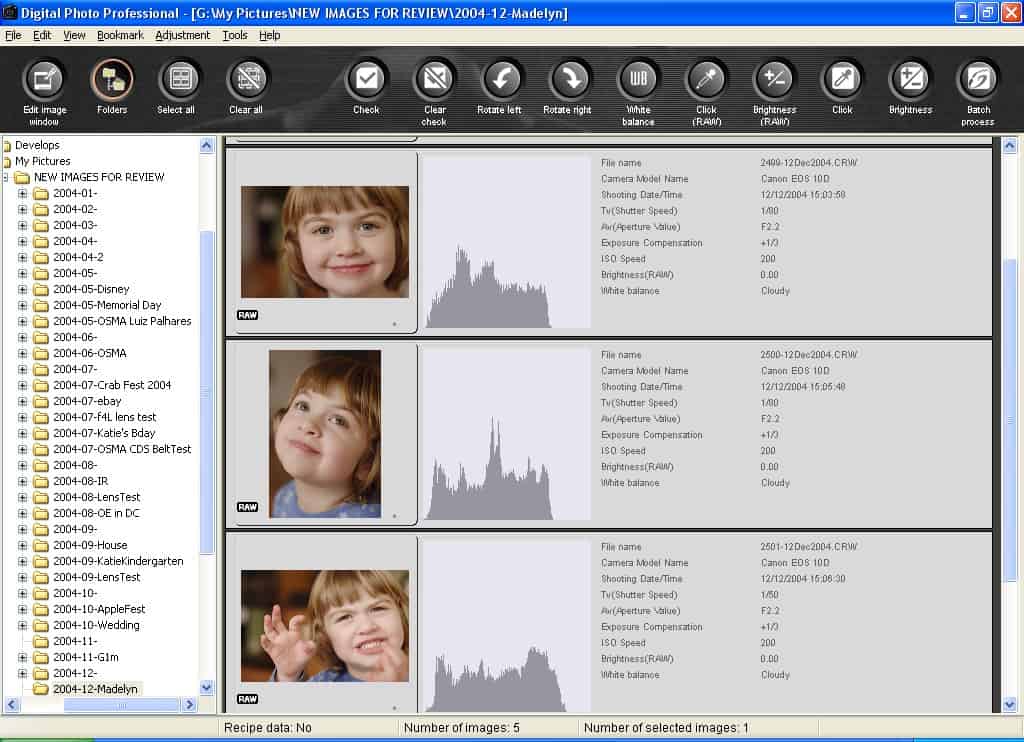
DPP’s Main Window is a simple image-browser with an editing toolbar across the top. Optionally, the thumbnail size can be increased, and basic shot-specific file info can be displayed with each thumbnail. In this window, basic settings like white balance and brightness can be edited. If the optional file info and histogram is displayed, adjustments to the brightness setting will be immediately reflected in the histogram – a handy feature for quickly adjusting exposure to match other images in a batch.

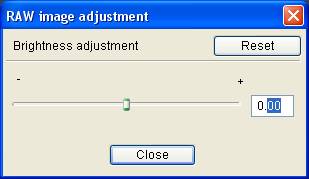
Note that what Canon calls “brightness” here is referred to as “exposure” in ACR and “exposure compensation” in Capture One. This feature lets the user adjust image brightness from minus two to plus two stops, in one-sixth stop increments when using the slider, and with much greater precision when entering a value directly.
What’s Your Preference?
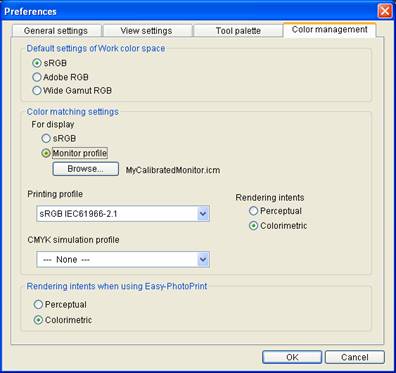
Before editing, we recommend that users take a moment to customize their DPP settings by clicking Tools > Preferences. This brings up a dialog box where users can select their image folder, output resolution, monitor profile, working color space, etc. It’s a simple process that only needs to be done once. The included 88-page PDF-format user’s manual has a detailed chapter on specifying the preferences for those who might not be familiar with some of the terminology.
Advanced Editing
While basic edits can be made in the main window, opening up the image in an editing window allows greater control and advanced editing functionality.
Oddly, Canon offers two different editing windows. Clicking on the “Edit Image Window” toggle button in the main thumbnail window accesses the “Edit Image Window”. This window retains the toolbar and browser functionality of the main window, provides a larger preview of a single image, and adds advanced editing controls with a tool palette on the right-hand side of the screen.
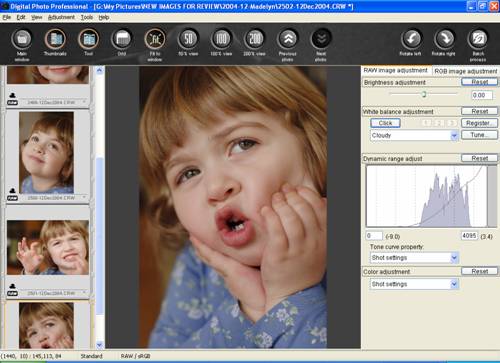
Instead of the Edit Image Window, users can access the stripped-down and unfortunately titled “Edit Window” by double-clicking on a thumbnail image in the main screen. This opens a new window on top of the main screen, which remains intact. The “Edit Window” drops the functions that were specific to the main screen and keeps only the advanced editing controls — the toolbar and browser are not displayed. Apparently this two-window approach was designed for dual-monitor editing environments, a smart feature for some but probably unnecessarily confusing for most.
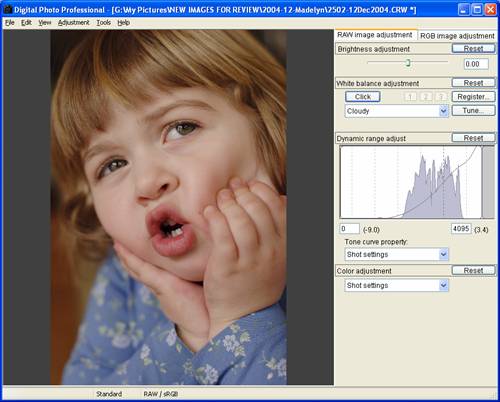
There are two tool palette tabs in the Edit (and Edit Image) Window: RAW Image Adjustment and RGB Image Adjustment. In the RAW tab, we can again edit “brightness” in the range of +/- 2.0 stops, adjust white balance, and tweak the tone curve and hue/saturation settings – most of what we’d expect in a RAW converter.
In the RGB tab we can edit RAW, JPEG and TIFF files. Most of the editing functionality is provided by a curve adjustment tool for the composite RGB channel, which can also be used to adjust the individual red, green and blue channels.
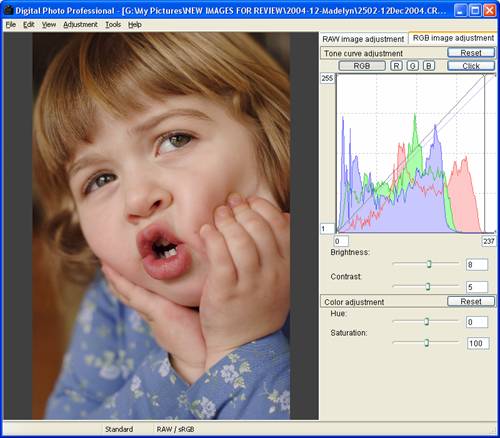
In this tab we also find another “brightness” slider – but be warned that this is not the same brightness we saw previously! Instead, this is similar to what other editing programs generally call brightness, and here the range goes from negative 100 to positive 100. We wish Canon had more clearly distinguished between the two types of “brightness” tools contained in DPP, as we’re sure at least some users will find their nomenclature confusing.
Notably absent from both tool palette tabs is a sharpening control, which we’ll talk about a little later.
Crop ’til you Drop
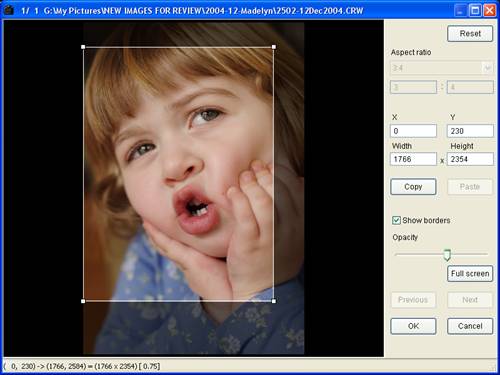
New in version 1.5 is a cropping tool, which Canon refers to as a “trimming” tool. For no reason we can fathom, this tool can be accessed from the Main and Edit Image windows but not from the Edit window. We’re happy to report that it is easy to use once it is found.
Not sharp, Canon
Our preferred workflow involves doing as much processing as possible in our RAW converter. If we can get a print-ready image without further processing in another program, we’re pleased as punch at the end of an editing session. (For those times when we might require further processing, DPP allows a converted file to be opened directly in one’s editor of choice.)
Included in the list of things we like our RAW converter to do is sharpening. JPEG sharpening was a feature of DPP version 1.0, and now Canon has added TIFF sharpening in version 1.5.
Here’s where things go awry, however: the sharpening controls are very basic (a slider ranging from 1 to 10), and there is no sharpening preview window. Instead, one must blindly select a sharpening amount in the convert/save window (or the batch process window, depending on which method one is using to convert and save.) For software that is supposedly geared to professionals, this lack of sharpening control is puzzling. We feel that it necessitates the use of third-party software for high-quality sharpening, and we note this as a major shortcoming of the DPP workflow.
To make matters worse, DPP does not have any sort of noise reduction feature. While it’s true that third-party noise-reduction software like Noise Ninja or Neat Image would make up for this shortcoming, that would require (1) an additional investment of cash, (2) an additional investment in time, making workflow less efficient. From a workflow perspective, we wouldn’t recommend DPP for high-volume shooters who regularly rely on higher ISO settings.
True Colors Shining Through
One thing we noticed about images converted with DPP is how accurate the colors appeared to be, straight out of the box. Comparing a series of images converted in DPP, Capture One and ACR, we concluded that DPP takes the cake for both accurate color reproduction and dynamic range extension. Capture One’s color reproduction was pleasant though tended toward warmth, and highlights tended to clip more easily than with DPP. ACR fared the worst for skin tones, though dynamic range was closer to that of DPP.
Admittedly, our tests were not extensive and only used images taken with a Canon 10D, so the results may not be truly representative of the three products’ capabilities. (Capture One in particular has known issues handling saturated yellows in 10D images.) However, we shouldn’t be too surprised to find that Canon software might have an edge reproducing colors from Canon cameras, given the inside knowledge their programmers would surely have regarding the camera’s processing algorithms. We must also note that the differences were minor and could be overcome with some additional pre-conversion editing work.
Conclusion top
Despite a somewhat confusing interface, an essentially useless sharpening mechanism, and a lack of noise reduction capabilities, DPP actually does a very good job at RAW image conversion, its color replication is top notch, and it is relatively easy to use. DPP version 1.5 is a nice improvement over earlier versions of the software and especially over the Canon “file viewer utility” that preceded it. While we still prefer the workflow advantages of Capture One, and know others who enjoy ACR’s tight integration with Photoshop, we would recommend Canon EOS Digital SLR owners who are considering the purchase of RAW conversion software give DPP 1.5 a try – it won’t cost anything but a little time, and many users will find that it does everything they need.
| Usability: |           (7/10) (7/10) |
| Features: |           (5/10) (5/10) |
| Performance: |           (8/10) (8/10) |
| Value: |           (10/10) (10/10) |
DPP 1.5 is available for free download at Canon’s regional websites, including http://www.canon-europe.com/Support/Patches/dpp/ in Europe.
Was this review helpful? Feel free to leave any feedback or comments.
