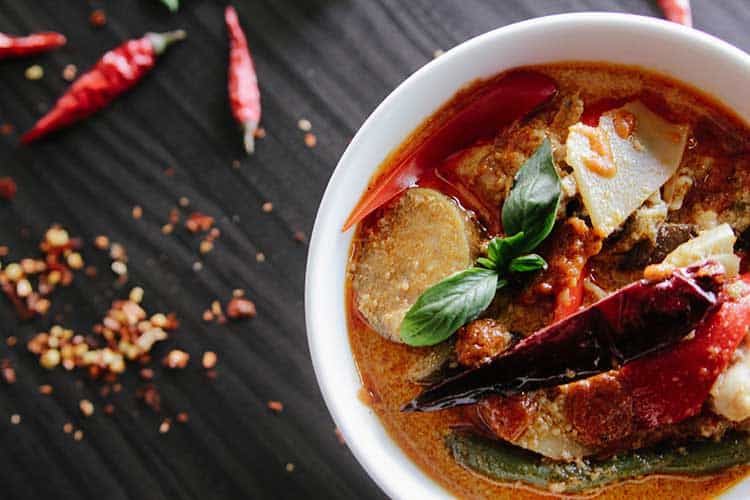
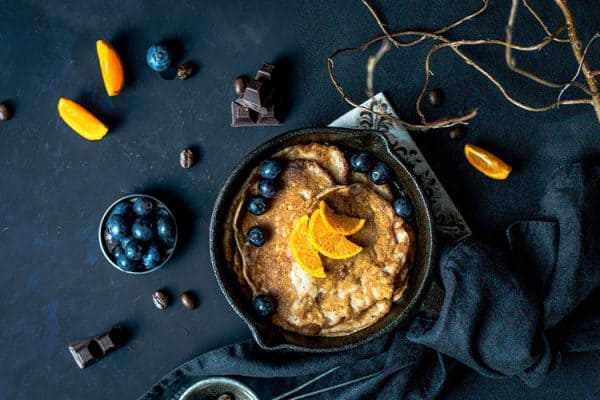
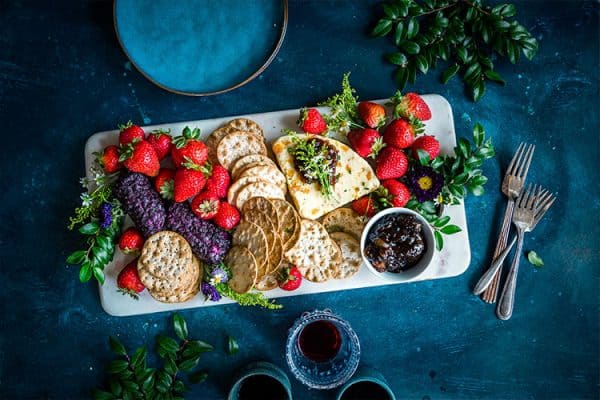
Have you been working on your food photography techniques for a while but still feel like your images are coming up short? Love browsing gorgeous meals on Pinterest and Instagram but can’t seem to capture the same look in your own photos? In theory, food photography seems like should be simple. Yet there are some simple editing techniques (and major editing mistakes) that beginning food photographers need to know about in order to elevate their images to professional quality.
What are the best editing techniques for food photography? For each food photo you edit, you’ll start with 5 basic techniques (crop up the image, adjust the exposure, adjust the white balance, adjust the HSL, and sharpen). Then you can move on to more advanced editing techniques to get that extra pop on your images. Finally, there are a few mistakes to avoid in the editing process and tips to take good images upfront that are important to know as well.
Contents
The First 9 Techniques
Basic Techniques
- Crop A Shot
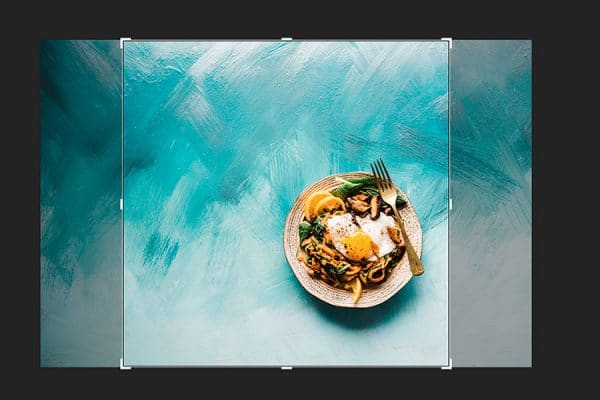
 Before you take any steps to edit the characteristics of the image, you’ll first want to take a step back and decide if the image needs to be cropped. Cropping allows you to take out whatever you don’t need in a photo or crop out that extra finger or corner of a napkin that accidentally landed in the shot. Cropping at this point also allows you to change the aspect ratio (e.g. go from a rectangular image to a square one) if needed for social media or however you plan to share the image.
 - Adjust the Exposure – The next step in editing the qualities of your food image is to examine and adjust the exposure. Editing software that allows you to adjust exposure on a sliding scale is actually adjusting multiple features at once. Depending on the software, you may be adjusting the brightness (how light or dark the image is), the contrast, and the tonal range of the image all at once, usually on a slider. In general, you want to identify the lightest and darkest part of your image and adjust the exposure to correct to those parts of the image. Exposure is also one way to change the mood of the image, so choosing carefully will make a big difference in the story your image tells. Note though that excessive changes to the exposure creates “noise” in the image so it’s better to capture the best exposure when you take the photo.
- Adjust the White Balance –
 While exposure adjusts the lighting levels, white balance refers to the temperature of the colors in the image. Changing the white balance settings can radically change the color and appeal of the food in your photos. While trends in food photography change, cooler white balances are more preferred as it helps the foods appear more fresh and crisp. You can also match white balance to the tones of the food item (e.g. a golden pie crust looks best with crisp, cooler color balance. cooler tones of blueberries may look better with warmer temperature in the image). Your editing software may include pre-set white balance settings. Figure out which ones match the tone you intend to set in the image. You may also decide to adjust white balance on your own. Note that just like exposure, white balance can be set on your camera prior to taking the photo and when set correctly, can make a big difference in the end composition of the image.
 - HSL Adjustments – The next step in editing your food photos is to adjust the HSL. HSL is an abbreviation for three types of post-processing techniques (H = Hue, S = Saturation, L = Luminance). Understanding how each of these works together to balance the colors in your image can elevate your food photos. HSL adjustments are likely where you’ll do the most editing to your photos. Your software may allow you to adjust HSL all at once, or you may be able to adjust them individually. Test the effects on your images and get to know how each works. Hue – Changing the hue bands will change how warm or cool each color in your image will be. For example, if you’re shooting a salad, you may decide that you’d like the green shades in your image to be slightly warmer or cooler. By sliding the hue, you’re adjusting just the green colors in the image, all others will stay constant. Saturation – In contrast, the saturation of the color refers to how ‘saturated’ or colorful the image is. In post-processing, you can turn an image into a black and white by removing the saturation completely. In most cases, adjusting the saturation should only be done with minor tweaks. Anything more than that and your images may turn out cartoonish or distorted. Luminance – Luminance refers to the brightness of each color. You can increase or decrease the brightness of all the colors in an image or just one particular color. Decide how the focal point of your image will look the best and use the luminance bars to adjust the brightness of the colors accordingly.
- Sharpen the image. The last step in the basic editing techniques is to adjust the sharpness of the image. Sharpening changes the contrast in the image, creating definition and ‘pop’ that food photographers crave. It’s important to know that—especially with food photography—that it’s not necessary to sharpen all areas of the image. See the mistakes to avoid section about why sharpening an entire image may actually detract from the subject.
Additional Post-Processing Techniques For Food Photography
Once you’ve completed the five primary editing techniques, you may want to consider one of these post-processing techniques to elevate your food photography. Note, that most of these effects are available on popular editing software packages. You may need to search online for guides on the tools in your specific software to learn where and how to use them.
- Take out dust or crumbs. – Occasionally that accidental crumb may show up on the table setting where you didn’t want it or you now notice a tiny fleck of dust on your lens. If any of these occur in your photos, use the spot removal tool in your editing software to quickly correct those tiny problems with your image. Then just remember to go back and clean the dust off your camera sensor so it doesn’t happen again!
- Remove or adjust the noise.
 Some editing software tools allow you to edit the noise level of an image in post-processing. Noise or a grainy appearance in certain areas of your image occurs when you shoot at too high of an ISO or didn’t get enough light into the sensor. Removing or adjusting the noise can smooth out these areas (but may also degrade the sharpness and quality of the photo in other areas of the image.
 - Add Vignetting – Depending on the mood or purpose of your image, you may choose to add vignetting effects to your image during post-processing. The software darkens the outer edges of the frame beginning in the corners. The effect is to draw in the eye to the focal point of the image. There are ways to adjust vignetting so it has harder and softer edges as well as change the midpoint so it more closely follows the subject in your photo.
- Add depth of field using the focus tools – Similar to vignetting options, some editing software allows you to change the depth of field in a particular part of an image. This puts one item in focus, and then slightly blurs out the parts of the photo that the eye does not need to focus on. The amount of focus and blur can be adjusted in the software, similar to how you would adjust the depth of field when you originally took the image.
5 Mistakes to Avoid in Food Photography
- Not shooting in RAW – This is less of an editing technique as it is a good reminder of a common mistake that beginning photographers make. Shooting in RAW format or RAW + JPEG gives you the most flexibility in adjusting your files later. If you’re learning editing techniques or you like heavily edited images, shooting in RAW format will give you a better final product.
- Over-editing – Just like portrait photography, food is meant to look as natural as possible. The more filters and post-processing you do with your images, the less likely you’ll be capturing the natural state of the food you shot. Beginning food photographers have a tendency to go overboard on the saturation of images, giving food a cartoonish and overly vibrant look. If you think your images might be leaning towards too many filters and presets, take a step back for a few hours and then come back with a fresh set of eyes. You’ll be able to better tell if it’s over-edited after a break.
- Using flash.
 Unless you’re in a studio with professional lighting equipment or you are looking for a special effect in your image, don’t use flash when shooting food. The light is too harsh and no amount of editing will be able to fix the glare.
 - Cropping incorrectly – Food photography requires the photographer to make some artistic decisions about how the image should be composed. Unfortunately, the tendency is to get as close as possible to the food, even though the food may look better if shot wider and at a bit of a distance. Shoot from multiple angles and don’t crop in too closely. Be sure to crop your props carefully also. Cutting off the edge of a fork or a plate in the wrong place can throw off the composition of the entire image.
- Editing all areas of the photo. One easy way to pick out a poorly edited food photo from the pack is when the editing techniques have been applied to all areas of an image. Good photo editors know how to use the tools in their photo editing software (e.g. a radial filter) to target specific parts of an image to edit. Rather than apply blanket filters and specialty effects to the entire image, professionals only edit certain areas (e.g. sharpen the focal point, not the background items). Be selective and only edit what parts of the image need editing.

Tips to Take Food Photos that Need Less Editing
If you’ve read other articles here, you’ll know that we often talk about the best editing starts with a good quality image in the first place. This holds true for food photography in that certain corrections are difficult to make when editing or make it clear that the image was heavily edited in post-processing techniques. It’s best to learn the strategies to take a good photo in the first place. Try reading up on camera technical skills and creative skills like composition to learn how to take the best photo upfront. Then follow some of these basic tips and you’ll end up with food photos that need less editing:
- Look for good quality light – Without light, there is no photo. Food photography demands that you identify the best lighting conditions possible. While you can use the techniques listed above to make tweaks later on, if you start with good quality lighting you’ll be far better off. See the related questions section below for more information on the best times for food photography in natural light.
- Try backlighting whenever possible. Along the same lines, how you position your food relative to the natural light source can make a big difference. Backlighting is a good choice to bring out the texture in foods. It can make for especially good photos of soups and beverages because of where the light falls on the liquid. Put your subject between the window and the camera whenever possible. Just be careful that your exposure is balanced between the front and back of the image.
- Try side lighting or side backlighting.
 If it’s not an option to backlight the photo, a second alternative is side lighting or side backlighting. With side lighting, the lighting source is directly beside the staged food. Side backlighting is a combination of both. The lighting source is slightly behind and to the side of the subject. Side lighting requires you to carefully watch shadows and the dimension of food textures. You may need to adjust the height of the lighting source so that it falls in the best place on the subject.
 - Change up the angle. A simple search on Google images will reveal how different angles can dramatically change the appeal of food in photos. The most popular way to shoot food photography is directly in front of the food or shooting from above. Within those two angles, there’s lots of variability and room for creative shooting. Each and every time you stage food photos, shoot from multiple angles. Try different shots and different lighting. It will give you the most choices when you go back to editing the photos later.
- Use a tripod
 – Tripods are gold standards for landscape and studio photographers, yet many food photographers skip over them because they’re a bit more cumbersome to shoot with at close range and when trying to quickly change angles and lighting. Yet professional food photographers will always work with a tripod to achieve as tack-sharp of photos as possible.
 - Use neutral colors for plating and tableware to make the color of the food pop. It’s not impossible to change the color and tone of the props you used in a shot later on, but it’s certainly more difficult. Whenever possible, choose neutral colors (tans, browns, white, cream, etc.) for plating and tableware. They’ll make the colors of the food “pop” more when you use editing techniques later on.
- Stage props in both the foreground and the background.
 One of the most fun parts of food photography is staging. Setting up the perfect plating and props can enhance the story you aim to tell about the food. One common mistake beginning food photographers make (which is nearly impossible to fix in post-processing) is staging props only in the background. It’s best to have props and items that fill parts of both the foreground and the background. Don’t overdo it though, cluttering up the scene will distract from the food.
 - Think About The Story You Want to Tell – Along similar lines, you’ll want to spend a few minutes as you are staging the image to decide what the story is you want to tell. Is this your great-grandmother’s cherry pie recipe? Are you shooting a new cocktail at a hip urban restaurant? Both images require a much different story and the props, staging and lighting should all convey that. Telling the story up front is helpful so you don’t have to try and re-create that effect while editing later. Capture the details that tell the story about your food by being mindful during the composition.
- Take Pictures. And Then Take More. In order to fine-tune your skills as a food photographer, you simply have to take photos. Lots of them. Practice shooting un-interesting food things like a cup or a piece of fruit. Shoot the same thing from as many different technical and creative aspects that you can think of. Practice shooting the same food staging during different times of the day. Spend time with those images, learn what you like and don’t like to help develop your style. It can also help you learn what can and cannot be corrected easily during the editing process. Then get back out there and shoot some more!
Here is a great video by New York Times food photographer Andrew Scrivani on how he goes about shooting food.
Related Questions
What is the best time of day for shooting food photography?
Unlike other types of photography, there’s a bit more flexibility in scheduling to get the best light. Depending on your home or studio set-up, you’ll need to time the best lighting based on the natural window lighting. Typically, the best natural light occurs during the ‘golden hour’ the first few hours of morning light and the last few hours in the evening. The light tends to be softer and diffused during these times.
You may find that you are able to shoot in one area of your kitchen or studio during the morning, but need to shift to different sets of windows in the afternoon or early evening. You may find that bright sunshine is too harsh coming through the windows, so drawing a curtain can provide better diffusion.
Plan a day to make a ‘light observation guide’ for your windows. Set a timer and every hour observe the light around the available windows. Document where the best natural lighting is for each time of day you’ll potentially shoot in. You’ll need to complete your guide seasonally though as the lighting from your windows will change at different times of the year.
What is the best camera lens for food photography?
Different types of photography require different types of lenses. For food photography, your goal is to get as close as possible to showcase the textures, colors, and details of the food. In order to do that successfully, you’ll want to select a lens with macro capabilities. Some say that you can have good luck with a telephoto lens, but in the end, it’s not the same as a macro lens. You can capture far more detail and get up close with action shots like frosting a cupcake or spreading jam on a slice of bread.
Certainly, it’s possible for you to shoot good quality food photos with other lenses, but a lens with macro capability may be the choice to elevate your food photography.
What is a macro lens filter used for?
Don’t have a macro lens? A macro lens filter, otherwise known as a close-up filter is one tool you might consider for better food photography. Close-up filters or close-up lenses attach to a standard lens in the same way as a UV filter or circular polarizer, but are used for macro photography.
Close-up filters can be thought of in the same way as reading glasses, providing a slightly greater amount of focus and magnification than a standard lens. Unfortunately, close-up filters also impact the image quality, often times limiting the usefulness of the filters. Most photographers that do a lot of macro level photography opt to purchase a true macro lens.