
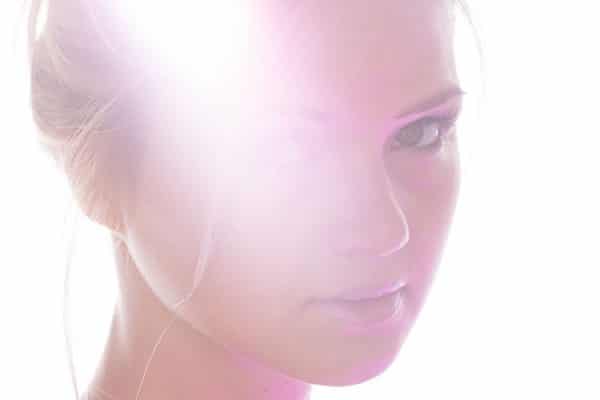
Among all the challenging photography scenarios you’ll encounter, photographing reflective objects without glare might be the most frustrating.
Plenty of beginner and professional photographers alike find the glare from shiny objects causes issues with image quality, image exposure, and the ability for a photo to tell a compelling story.
So what is the best way to photograph shiny objects without glare?
While there are some post-processing techniques to correct glare in photos, it’s best to reduce the glare before you take the image. There are options to reduce or eliminate glare with lighting, with specialized gear, or with configurations to your camera.
Knowing how to address glare with both proper photography technique and post-processing tools can help reduce the challenges of photographing shiny objects without glare.
Contents
What is glare, and why is do photographers avoid it?
Before anyone tries to problem solve glare in photography, it is best to know what it is and why it causes issues in photos.
Glare describes what happens when light reflects off a surface and into your eyes or into the camera lens.
It creates an area in an image where the colors, texture, or surface cannot be captured because the light is too bright.
It can reduce the contrast of an image or cause unintended haziness.
It can also distract the eye from the subject of the photo.
To have glare, you need two things: a reflective surface and light hitting the surface at an angle.
The magnitude of the glare can change depending on the angle and intensity of the light.
Some glare can be helpful in photography.
Glare is necessary to capture the true nature of shiny objects like cars and jewelry.
It can highlight textures and definition in still life photos like food photography.
Glare can even be a useful storytelling tool in abstract or street photography.
But as mentioned above—when it comes to glare—too much of a good thing causes trouble.
What causes glare?
One of the reasons why camera glare is easy to address is because light acts in predictable ways.
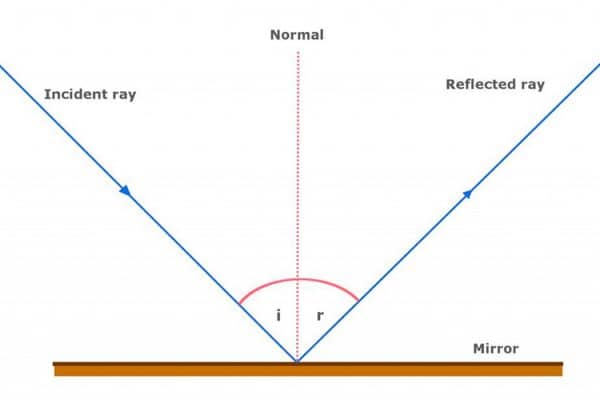
So much so, that glare can be described through what’s known as “The Law of Reflection.”
The Law of Reflection explains that light that hits a reflective surface at an angle (like the front of a person’s eyeglasses) will be reflected back at the same angle.
In other words, the angle of incidence equals the angle of reflection.
For example, stand near a mirror positioned flat on the ground.
You’ll notice the surroundings of your room reflecting back in the mirror.
As you walk around the mirror, the angle of the objects reflecting at you will change, stretching and shrinking depending on how close or far your movements are from the mirror.
According to The Law of Reflection, the angle of reflection in the mirror is precisely equal to the angle of incidence.
When it comes to glare or light reflecting off a surface, the angle of the glare that you see is exactly equal to the angle of the light.
If you change the incidence or where the light is coming from, you can change the reflection or amount of glare coming off the surface of the object.
Identifying the source of the glare (the lighting), the angle of incidence, and the reflective surface are critical factors to reducing or eliminating the glare in a photo.
Common Objects that Cause Glare
Reflective surfaces come in all shapes and sizes. While not an exhaustive list, these are some of the common surfaces where you’ll need to make adjustments for glare:
- Mirrors
- Bodies of water or wet surfaces
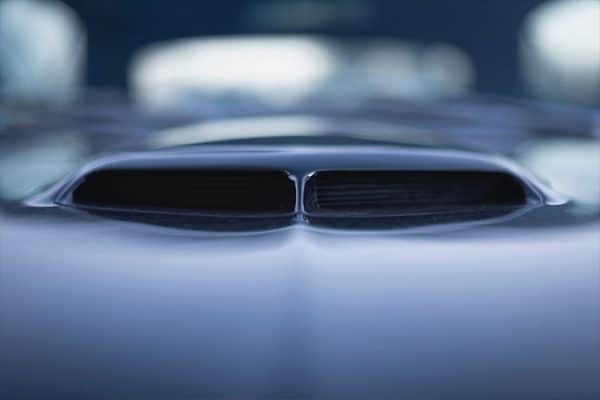
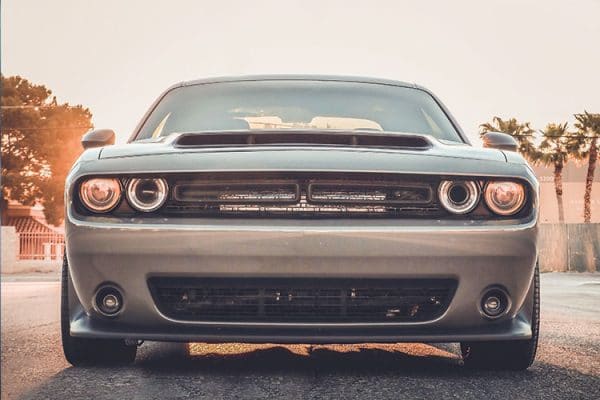
- Vehicles (headlights, windshields, any metallic or chrome surfaces, etc.)
- Items made out of glass (windows, screens of electronics, dinnerware, storefronts, aquariums, etc.)
- Eyeglasses or sunglasses
- Jewelry, watches, and metallic accessories
Regardless of the type of reflective surface you encounter, the objects all fall under the Law of Reflection.
Light will generally follow the same principles irrespective of the type of surface and should be addressed using the same techniques.
How to Photograph Shiny Objects Without Glare
There are three main ways to address glare in your photos.
The first—and without a doubt, the best—way to reduce glare is through adjusting the lighting in your image.
The second and third techniques involve using some specialized camera gear and camera configurations to help reduce the amount of glare captured by your camera sensor.
Given how important lighting is to glare, it’s best to address those techniques first.
The Best Lighting Tricks to Photograph Shiny Objects
As mentioned above, with the Law of Reflection, adjusting lighting is the easiest way to change the amount of glare in a photograph.
Below are some suggestions about ways to use light and the law of reflection to minimize or eliminate glare with lighting.
Diffuse the Light
The most straightforward strategy to photograph shiny objects without glare is to diffuse the light source.
By spreading out the light source more evenly, you can reduce the amount of glare in the photo.
Diffusion can be accomplished in many different ways.
You can use studio lighting equipment, a fabric reflector, or merely placing the subject out of the sun and in a shady spot.
The more control you have over lighting, the more control you’ll have over glare.
Techniques like bouncing the light source off another object before it reflects onto your subject, adding a second light source to spread out the angles of incidence, or placing a light modifier between your light source and the object (see camera gear below).
Create a Tabletop Studio
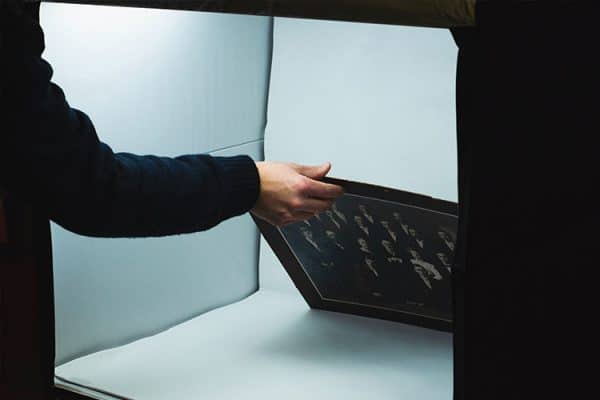
If the object you intend to photograph is small, like jewelry or a food item, consider creating a tabletop studio to diffuse the light.
Tabletop light studios can be purchased or made from white cardboard formed into a box surrounding the object.
The white surface diffuses light placed on the outside of the box and scatters the angles of incidence so to reduce and eliminate glare.
It also gives greater control over the positioning of the light source.
Backlighting the object can be helpful for reflective and see-through objects like glassware.
For objects like jewelry or a watch, try placing the object in the tabletop tent and then side-lighting from both sides or from 45-degrees.
For metal objects, position lighting from above or as many angles as possible.
A tabletop studio also allows you to move the lighting source closer or farther away from the object.
Closer lighting can create more intense lighting patterns.
The greater the distance from the object, the more diffuse the light will be otherwise.
Change the angle you are shooting from.
If you’ve done your best to adjust the angle of incidence (lighting source) but still experience a glare, you may consider changing the other variable in the Law of Reflection (camera angle).
Especially when photographing portraits with eyeglasses, slightly adjusting the camera angle can make a big difference in the amount of glare in the finished image.
Tilt the subjects head slightly down or bend the glasses slightly forward on the subject’s face.
Consider changing the angle of the camera slightly lower or slightly above the subject’s face.
Just as you changed the angles as you walked around the mirror on the floor earlier, you can similarly change the angles of the reflection by changing the angle you shoot from.
For larger objects, shoot in The Golden Hour or on an overcast day
For some objects, it’s not possible to shoot on a make-shift tabletop or using studio lighting.
For landscapes with a body of water or large objects like vehicles, you may not have options to adjust the light artificially.
In that case, the only way to reduce or eliminate glare is to improve natural lighting as best as possible.
Two strategies to consider are shooting during the Golden Hour or on an overcast day.
The Golden Hour is a photography term to describe the first few hours of daylight of the day or the last few hours of sunlight at the end of the day.
The sun is low in the sky during these hours and does not create harsh shadows or as much glare on objects as when it’s overhead.
Shooting in the golden hour maximizes the chances that you could photograph an object with low or no glare from the sun higher in the sky.
Shooting in the Golden Hour is not always practical for photographers.
In that case, you may choose to shoot larger objects or landscapes on an overcast day when there’s more cloud cover.
This can reduce glare and harsh shadows on objects that are too large to diffuse the light or use studio lighting.
Avoid objects that will reflect on the subject.

If you’re not able to fully control the lighting source and you’re bound to end up with some glare in your photo, it’s best to control what appears in the glare.
In this case, it’s important to neutralize the background in the reflection to cause as little distraction as possible.
Finally, if you are not the intended subject of the photo avoid photographing yourself and any of your camera equipment in reflections.
It’s a quick way to cause distraction in any picture, and it’s a problem when the viewer stops looking at the subject and starts trying to investigate the person behind the camera reflected in the image.
The Best Camera Gear to Photograph Shiny Objects
While lighting is the most critical element of reducing glare in images, there are some tricks to camera gear that can help you reduce the glare in your pictures.
No equipment is a substitute for proper technique, but they can make a difference in specific situations.
Try adding these to your studio or camera bag when you know you’ll be photographing reflective objects:
Artificial Lighting Tools
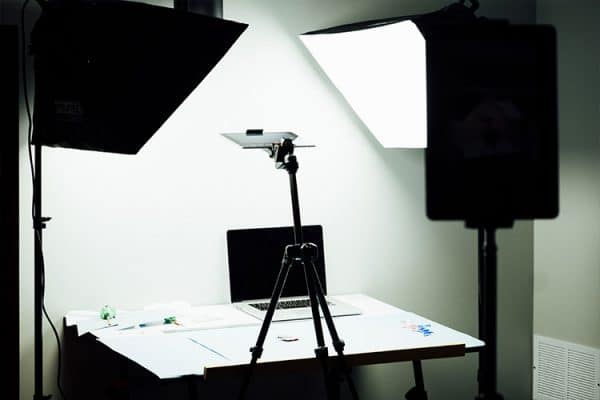
As mentioned above, if you plan to be regularly photographing reflective objects, you’ll want to consider artificial lighting and advanced studio lighting equipment.
Artificial light sources like continuous lighting and flash lighting can be useful tools in creating the best angles of incidence using the Law of Reflection.
Light modifiers like softboxes, umbrellas, reflecting panels, and diffusing paper can all give you greater control of the glare on the surface of the subject.
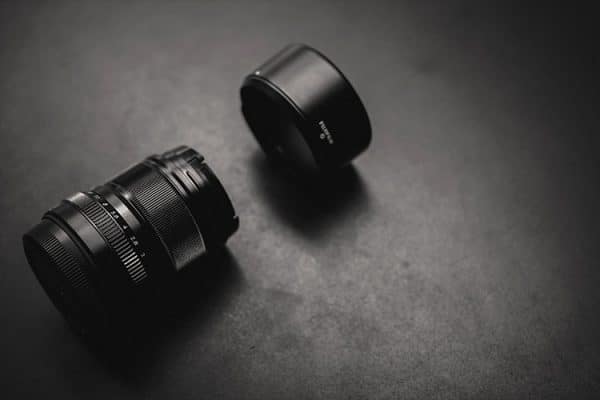
Polarizing Filters
If shooting through glass or the reflections from water are the culprit of glare in your photos, you may want to consider attaching a polarizing filter to your lens.
Circular polarizing filters come in a variety of different sizes for different lenses.
They screw directly onto the end of a lens or can be fitted with a special lens filter holder.
An incredible tool for reducing glare, a polarizing filter only allows specific wavelengths of light to pass through the filter to your lens.
When used with glass or water-related glare, the polarizing filter can be configured to eliminate all or some of the reflection off the glass.
Before and after images utilizing a polarizing filter show how the dramatic effects of using a filter to reduce glare.
Lens Hood
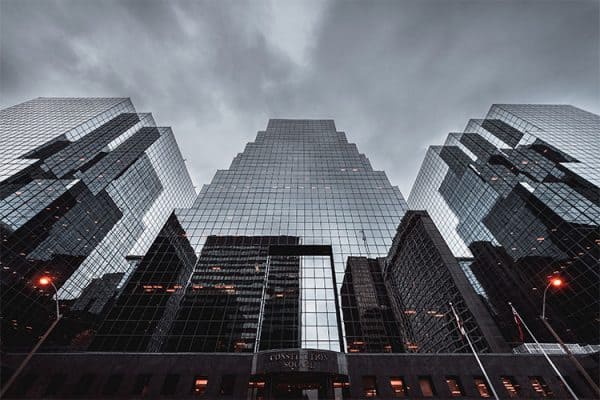
Shooting high above a city skyline through the glass walls of an observation deck represents one of the most challenging glare situations for a photographer.
The glare from the glass quickly sucks the detail and quality out of an image.
The same applies to aquariums, storefronts, or vehicle windows.
One trick for managing the glare when shooting through glass is to attach a lens hood to your camera lens and then place the hood directly against the glass.
By placing your lens directly against the glass, you can shield the lens from light reflecting off the surface of the window.
Blocking it out also blocks out the glass.
There are several specialty lens hoods on the market for this type of glare reduction, but an expensive tool isn’t always necessary. If you find yourself without a lens hood, carefully place your lens close to the glass and use your left hand to block the light.
Or carry a piece of black cloth fabric to drape over the end of your lens to shield out the light.
Tripod with Remote Shutter Release
If you plan to use a tabletop lighting system or any type of artificial lighting to capture still life or portraits with shiny objects, you’ll want to consider shooting with a tripod and remote release.
The best camera settings for shooting shiny objects without glare require the camera to be kept as still as possible.
Any amount of camera shake will only be magnified by the glare.
When purchasing a tripod and a remote shutter release, choose a high-quality tripod that’s easy to set up and adjust.
Make sure that your tripod can hold the total weight of your camera and your heaviest lens combined.
Remote shutter release systems come in all different types and styles. Check ratings and make sure the one you choose is compatible with your camera model.
Dulling spray
Dulling spray is a standard product found in movie and theater production studios to prevent a shiny object from causing a distracting glare for actors, the audience, or on video.
Dulling sprays come in a can like spray paint and are applied directly to the shiny surface to create a matte finish.
It removes or reduces the glare on objects and is especially helpful for objects that are not central to the photograph (e.g., silverware or wine glass in food photography).
The Best Camera Settings to Photograph Shiny Objects
If you’ve mastered the lighting tricks and have added some new gear to your camera bag, you’ll also want to learn how to configure your camera to best photograph shiny objects.
Adjusting how your camera responds to the available light can help minimize or eliminate glare you’re not otherwise able to control with lighting manipulations or specialized gear.
Experiment with these camera settings the next time you’re shooting reflective objects:
Turn Off Your Flash
This might be an obvious place to start, but if there’s not a specific reason to be using flash or if you don’t have the proper light diffusion tools, you should turn off your camera’s flash.
There’s a good chance if your shooting through a window or a portrait with eyeglasses, your camera flash will cause glare.
When it comes to glare, don’t use your camera’s attached flash unless you have a specific purpose for it.
Use Manual Mode or Aperture Priority Mode
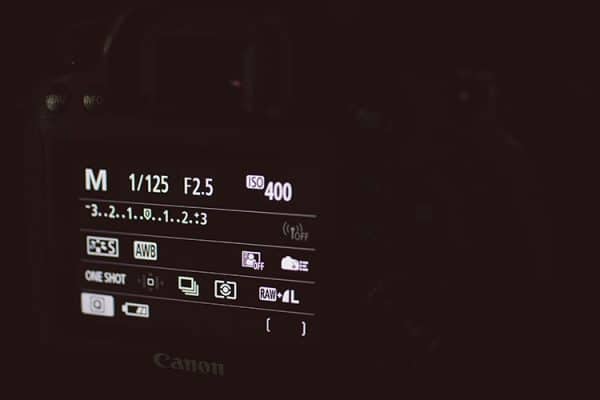
Photographers that run into challenging lighting conditions should always default to the settings that offer the most control over what reaches the camera sensor.
If you’re not already shooting in manual mode, when you run into lighting situations that include glare, it’s a good time to switch over.
Manual mode offers you the most control over how your camera responds to the available light.
Don’t feel comfortable shooting in manual mood?
Try out aperture priority mode instead. Many professional photographers shoot in aperture priority mode because it’s the next best available alternative to shooting in manual.
It allows you to have reasonable control over the light that reaches the camera sensor but doesn’t require you to configure all of the settings for the photograph like you would in manual mode.
Use a small aperture, faster shutter speed, and lowest ISO settings
While it won’t eliminate it completely, the best way to configure your camera in manual mode for photographing shiny objects is to select a narrow aperture, fast shutter speed and the lowest ISO setting possible given the conditions.
Together, these settings will control the amount of light in the photograph, and slightly underexpose areas where glare becomes an issue.
The small aperture also gives the most amount of clarity in the specific areas where glare becomes an issue.
Try less depth of field
One final strategy you might consider when it’s not possible to reduce the glare in a photograph is to adjust the depth of field.
By shortening the depth of field so that the glare is out of focus, it’s possible to blur out the reflections.
While not a perfect solution, in some situations, it may be enough to provide clarity to the subject and obscure any of the distractions that may be caused by the glare.
How to Remove Glare from Shiny Objects in Photoshop and Lightroom

If you return from a photography outing only to find the best images from the shoot include glare, it’s possible to remove or eliminate some of the issues in post-processing.
Photoshop and Lightroom both offer tools that can address glare and reflective objects without reducing the quality of the image.
As always, it’s best to shoot in RAW mode to have the maximum chance of editing out glare in post-processing.
Try these tools to help achieve the best results:
Clone & Patch Tools
One of the most popular ways to remove glare in Photoshop and Lightroom are the clone and patch tools.
Identify the area that includes glare, create a clone using the clone tools, and then patch the area with an alternative.
It’s possible to use the Spot Removal Tool or the Spot Healing Tools for this as well.
It’s important to note that this technique should only be attempted with small areas of reflection in an image like eyeglass glare.
It also requires some careful editing to make sure your selected patch is a realistic substitute for the area you cloned.
When spread across large regions of an image, clone and patch tools may not be the best suited to reduce glare.
Dehaze Tools

Another quick tool that can remove small amounts of glare from windows or glare from light directly behind the subject is the “Dehaze” slider.
Found in the Effects pane of Photoshop and Lightroom, the slider can decrease haze caused by the sun entering an image from behind the intended subject.
In some cases where glare is wide-spread across the picture, the dehaze slider can also sharpen up and increase the quality of the image.
Shadows and Highlights Sliders
While it’s not likely to remove glare or reflection from an object altogether, another strategy to try in post-processing is to adjust the shadows and highlights sliders.
Areas of glare in your image can appear washed out or over-exposed.
The detail and quality of these parts of the image are completely gone.
Shadow and highlight sliders allow you to darken and lighten the areas of your image that have glare, as well as change the tone or the color of the glare.
The goal is to detract less from the rest of the picture.
Again, it’s not likely to correct glare in an image in the same way that the clone or patch strategy will, but it’s possible to do some correction of the overexposed areas of an image this way.
Adding reflection to photography: When is glare a good thing?
As mentioned above, you may find times when taking photos of reflective surfaces elevates your images.
Creative use of glare can be especially prevalent in street photography, architecture photography, and landscapes of bodies of water.
How many times have you seen distant mountains reflected in the mirror of a nearby glassy pond?
If you intentionally want to use glare in your composition, some tricks can be helpful to get tack-sharp reflections in your images:
- Notice the best reflections. Just as it’s essential to slow down and examine the source of glare when you’re trying to remove it from an image if you want to compose a reflective image you’ll need to seek out situations where reflections naturally occur. Windshields, glass buildings, metal objects, bodies of water and anywhere after a rain shower are all good times to be watching for the best reflections.
- Choose the angle carefully. While it’s not always possible to scout a location first, it can be helpful to spend some time finding the best angle to shoot your reflective surface from. As mentioned in the Law of Reflection above, the angle of reflection is equal to the angle of incidence, or where the light originates from. Finding the best angle can take some careful planning and scouting, moving closer or farther from the reflective surface.
- Use a tripod and shutter release. The best reflection images are taken on completely still reflective surfaces using a tripod. Any amount of camera shake is likely to ruin the effect of the reflection.
- Shoot in the golden hour. As mentioned above, the best times for light to reflect off surfaces is when the natural light source is low in the sky. Shooting early in the morning or late in the day will highlight the sky in more exciting ways in the reflections.
- Remove polarizing filters, but try a neutral density filter. The quality of the reflection will definitely be impacted by any polarizing filters. It’s best to shoot reflections by focusing carefully on the lighting conditions of the subject without a polarizer which will remove some wavelengths of the reflection. Instead, you may consider a neutral density filter or graduated neutral density filter. These offer photographers the ability to filter lighting in different parts of the image and leave others exposed (e.g., filter out snow-capped mountains but leave reflection in the lake clear).
- Shoot in black and white. Sometimes the contrast of a black and white photo can enhance an image with a glare. The highlights and shadows work together differently in black and white than in color images, enhancing the reflection, and telling a more compelling story of your subject.
Related Questions
How do you photograph objects without shadows?
Just like photographing objects without glare, photographing objects without shadows is all about lighting.
Shadows can distract from the subject, hide features you wish to show, or over and underexpose parts of the image.
Natural lighting is always preferred in photography, but it can cause issues with shadows and harsh lighting.
Just like with glare, you may need to change the lighting conditions to reflect the most favorable light on a subject.
One option is to light the subject front-on.
This can reflect shadows directly behind the subject and out of view of the frame.
If that’s not an option, a softbox or reflector is a better choice to diffuse light from the opposite side as the source.
If you’ve taken a photo with shadows, it’s possible to use software platforms like Photoshop or Lightroom to minimize or eliminate them.
Most photography software platforms offer the option to raise and lower the magnitude of shadows in an image using a slider tool.
You can also duplicate the background, remove the shadow using a retouching function, and then replace the background over the original.
Poor lighting rarely can be fully corrected in software.
It’s best to use proper techniques to achieve shadow-free images in the first place.
What’s the difference between a softbox and an umbrella?
Both softboxes and umbrellas are light modifiers.
They are a set of tools in a photographer’s toolbox to ‘modify’ or improve the existing light to be more flattering to the subject.
They can bend light, diffuse light in ways that create the best conditions possible.
Softboxes and umbrellas are the two most popular types of light modifiers that are used to enhance current lighting conditions for better portraits.
Softboxes come in a variety of shapes and styles, all of which use a simulated light source (from a flash, studio strobe or another light source) to emulate natural window light.
The light produced from the softbox is directed outward in an even distribution that reduces shadows and closely resembles natural window light.
In contrast, photography umbrellas look very similar to your standard rainy-day umbrella with some enhancements.
They can be used with many different types of light sources (e.g., sunlight, electronic flashes, strobes, continuous light sources) and come in different reflective materials.
Umbrellas are popular among photographers because of their portability and mobility.
Amy has covered this subject very well.
Some subjects like artwork (specifically oil paintings) can be very challenging because the surface is not flat on a micro scale and so all lighting angles can create glare. Very soft light and polarizing filters can help.